When you are developing an iOS application you will often have to fetch images from a CDN and this can take time depends on the size of the image, the server speed and the network connection of the device. During this fetch time your UI will already be rendered and you want to display a visual indicator of the image fetching progress. On iOS you have the default UIActivityIndicatorView. It works, but you can easily create a new one more personalised.
Requirements
-
Xcode
-
Knowledges in Swift
-
Apple Swift official documentation (https://developer.apple.com/documentation/quartzcore)
-
Swift Playground
Let’s dive into the code
First, we need to create the shape of our loader. For this example, we want a circular loader.
Let’s create the track layer, used to display the shape of the loader.
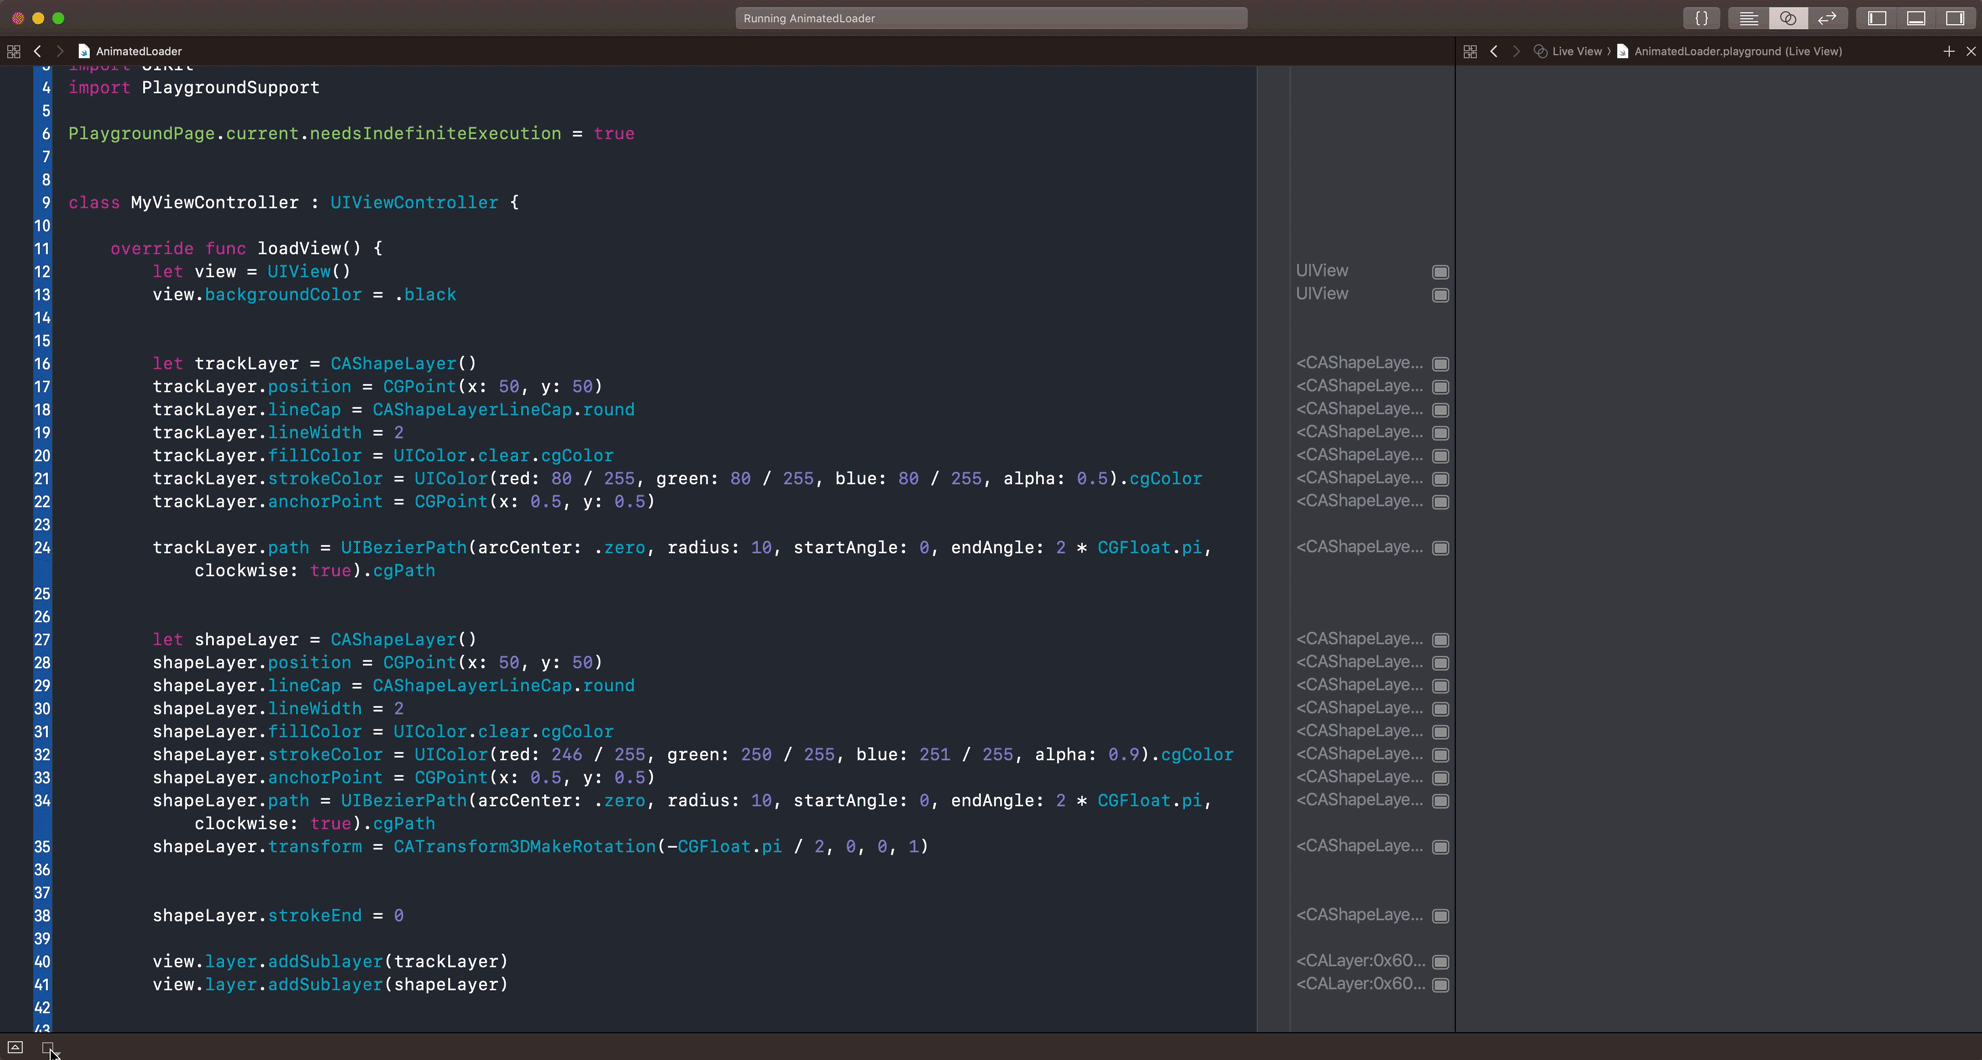
    let trackLayer = CAShapeLayer()

    trackLayer.position = CGPoint(x: 50, y: 50)
    trackLayer.lineCap = CAShapeLayerLineCap.round
    trackLayer.lineWidth = 2
    trackLayer.fillColor = UIColor.clear.cgColor
    trackLayer.strokeColor = UIColor(red: 80 / 255, green: 80 / 255, blue: 80 / 255, alpha: 0.5).cgColor
    trackLayer.anchorPoint = CGPoint(x: 0.5, y: 0.5)
Now that our layer is created, we want to define the circular shape.
trackLayer.path = UIBezierPath(arcCenter: .zero, radius: 10, startAngle: 0, endAngle: 2 * CGFloat.pi, clockwise: true).cgPathIn order to display the track layer we have to add it to the view.
view.layer.addSublayer(trackLayer)If you run your playground, you will see a circular shape on the top left corner.
Well done, we have our track layer ready. Now we need to create a new layer that will superpose with the track layer and fill it depending on the loading progress.
    let shapeLayer = CAShapeLayer()

    shapeLayer.position = CGPoint(x: 50, y: 50)
    shapeLayer.lineCap = CAShapeLayerLineCap.round
    shapeLayer.lineWidth = 2
    shapeLayer.fillColor = UIColor.clear.cgColor
    shapeLayer.strokeColor = UIColor(red: 246 / 255, green: 250 / 255, blue: 251 / 255, alpha: 0.9).cgColor
    shapeLayer.anchorPoint = CGPoint(x: 0.5, y: 0.5)
    shapeLayer.path = UIBezierPath(arcCenter: .zero, radius: 10, startAngle: 0, endAngle: 2 * CGFloat.pi, clockwise: true).cgPath

    view.layer.addSublayer(shapeLayer)
We are almost done, we just need to change the orientation of the shape layer. Currently our shape layer stroke start on the center right and we need the stroke to start on the top center like a regular loader.
shapeLayer.transform = CATransform3DMakeRotation(-CGFloat.pi / 2, 0, 0, 1)Add this line before adding the shapeLayer to the view layers.
And voila, we are done. To animate your progress loader you need to change the strokeEnd property of the layer. Keep in mind that the value must be between 0 and 1 (convert in percentage).
shapeLayer.strokeEnd = 0.5 // 50% loading progressIf you want to see the animation inside your playground you will need a bit more work.
First, let’s add the infinite execution for the playground, otherwise you will not be able to see any animation because the playground will stop right after the last statement in your function, asynchronous code will not work.
    import PlaygroundSupport

    PlaygroundPage.current.needsIndefiniteExecution = true
To simulate loading progress we will use a Timer , every period of time the timer will execute a block of code. In our case the block of code changes the strokeEnd property of our layer.
    Timer.scheduledTimer(withTimeInterval: 0.2, repeats: true, block: { (timer) in
        shapeLayer.strokeEnd += 0.1
        if shapeLayer.strokeEnd > 1 {
            timer.invalidate()
        }
    })
If you play your playground you will see the loader animating during 2 seconds.
 Animated progress loader
What’s next ?
If you want to use this loader inside your application you can put all this code inside a separate view with a progress property that will update the layer according to the value.
Thanks for reading ! 😊